


In Part 1, we covered the basics of macOS management in Intune. Now, let’s focus on how to enroll macOS devices into Intune using three different methods.
Depending on whether the device is corporate-owned or BYOD (Bring Your Own Device), Microsoft Intune offers three primary enrollment methods:
Automated Device Enrollment (ADE) – Best for corporate-owned devices, requires Apple Business Manager (ABM).
Device Enrollment (Manual) – For company-owned or personal devices without ABM.
User Enrollment (BYOD) – Ideal for employees bringing their own macOS devices.
Understanding macOS Enrollment Methods
Enrollment Method Best For Requires Apple Business Manager? Management Level Automated Device Enrollment (ADE) Corporate-owned devices ✅ Yes Full control (Supervised) Device Enrollment (Manual) Any device ❌ No Full control User Enrollment (BYOD) Personal devices ❌ No Limited control (Work profile only)
💡If your organization manages corporate-owned Macs, ADE is the recommended method.
Prerequisites for macOS Enrollment
Before enrolling macOS devices, ensure you have the following:
✅ General Requirements
✔ Microsoft Intune License (included in Microsoft 365 E3/E5 or as a standalone license)
✔ Apple MDM Push Certificate configured in Intune
✔ Apple Enrollment Program Token configured in Intune
✔ Company Portal App installed on macOS devices (required for User Enrollment)
🏢 For ADE (Automated Device Enrollment):
✔ Apple Business Manager (ABM) account
✔ macOS devices linked to ABM, either via reseller or manual via the Configurator 2 app
Method 1: Automated Device Enrollment (ADE) via Apple Business Manager
In this blog post, I am assuming that you already have an active Apple Business Manager and thus have already made the connection between ABM and Intune. If you haven't done so yet, check out this Microsoft Learn article on how to accomplish this.
Step 1: Deploy Enrollment Profile
In Intune, go to Devices -> macOS -> Enrollment -> Enrollment Program Tokens
Select your Token name and go to Profiles
Click on Create Profile and select macOS
Give the enrollment profile a name
Configure:
User Affinity: Enroll with user affinity
Authentication method: Setup assistant with modern authentication
Await final configuration: Yes
Locked enrollment: Yes
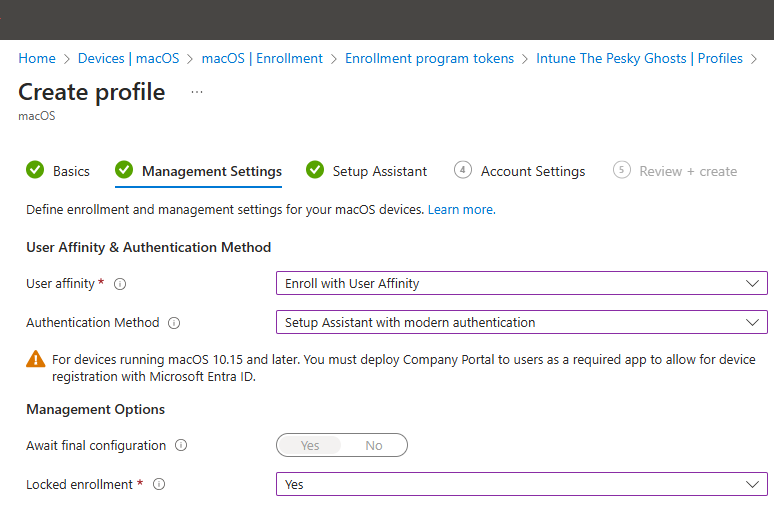
Configure:
Department: Fill in a department
Department Phone: Fill in a number
Setup Assistant Screend: Choose the screens which you want to show to the end-user. For more detailed information about these setup screens, go to the Setup Assistant screen reference.
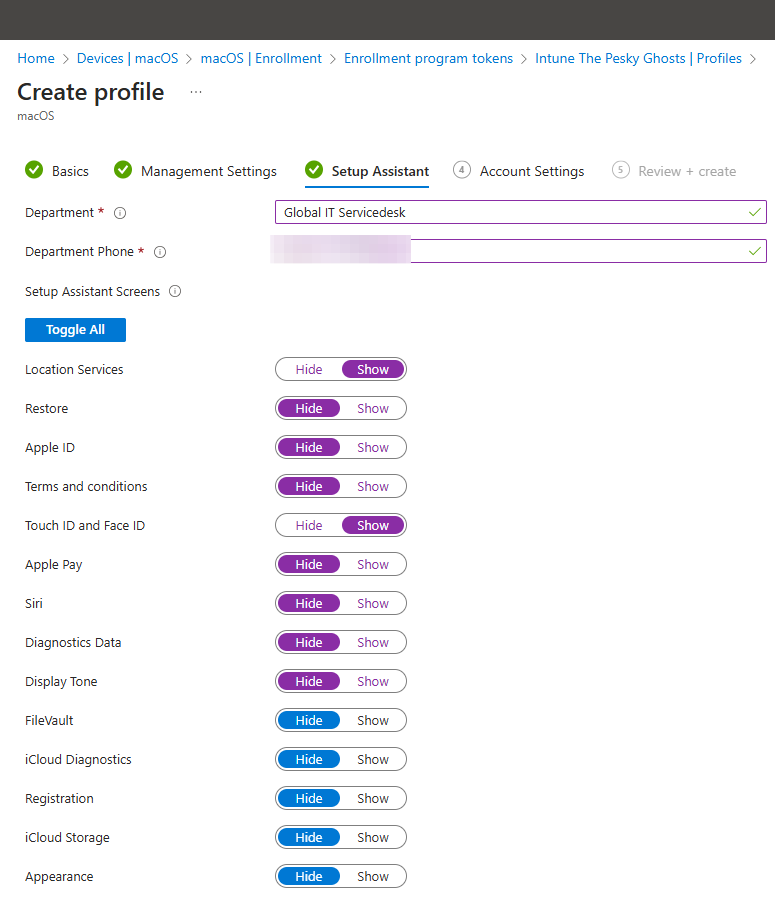
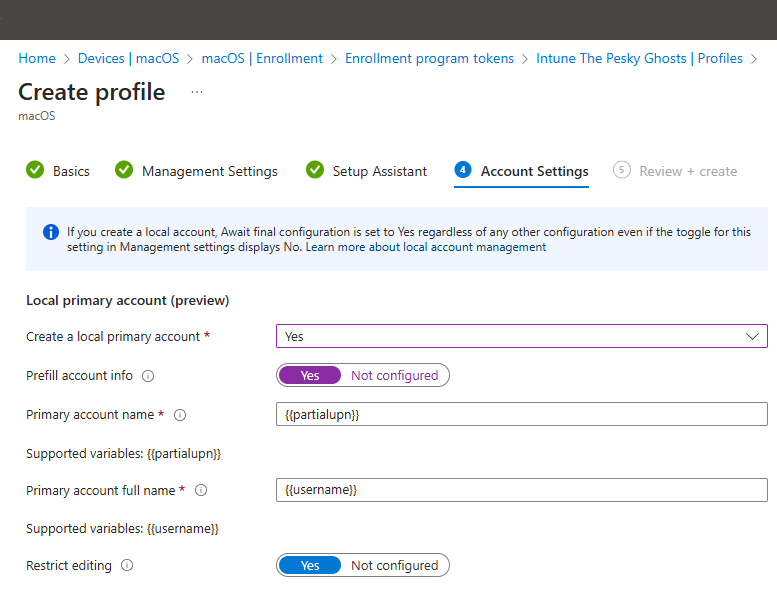
Configure:
Create a local primary account: Yes
Prefill account info: Yes
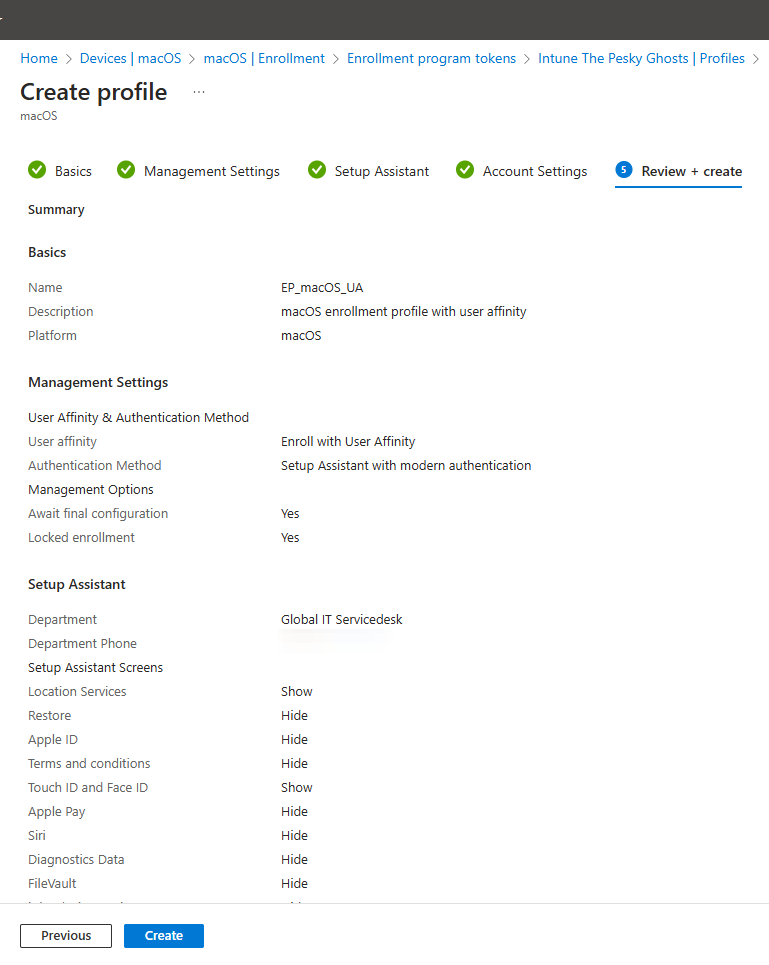
Click on Create
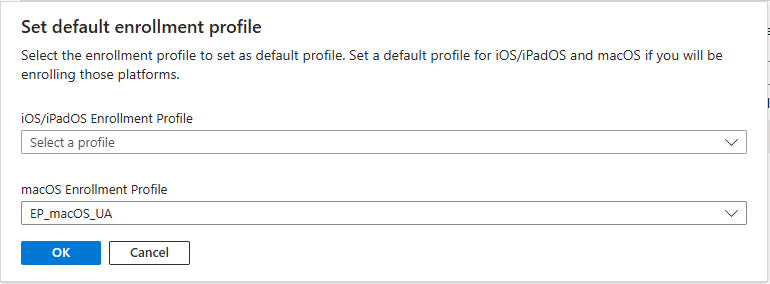
Click on Default profile and select under the macOS Enrollment Profile, the newly created profile.
Step 2: Turn on the macOS Device and Enroll
When a new or wiped macOS device starts up, it will automatically enroll in Intune
The user logs in with their Entra ID credentials
Policies, apps, and configurations are pushed from Intune
✅ Best for: Corporate-owned, fully managed macOS devices
🎥 Below is a recording of an enrollment of a macBook with ADE. 👇
Method 2: Device Enrollment (Manual Enrollment)
For corporate or personal devices that are not in Apple Business Manager, use manual enrollment.
Step 1: Enable "Personal" Device Enrollment in Intune
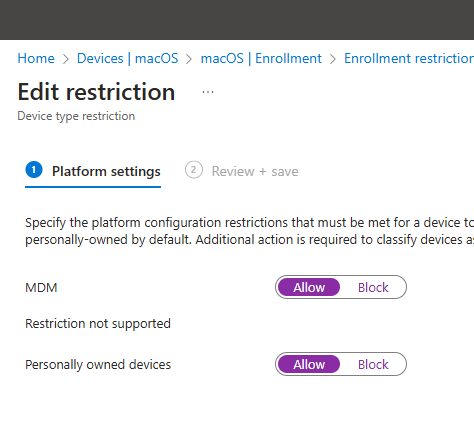
In Intune Admin Center, go to Devices > macOS > Enrollment > Device Platform Restrictions
Ensure that Personally owned devices is allowed
💡
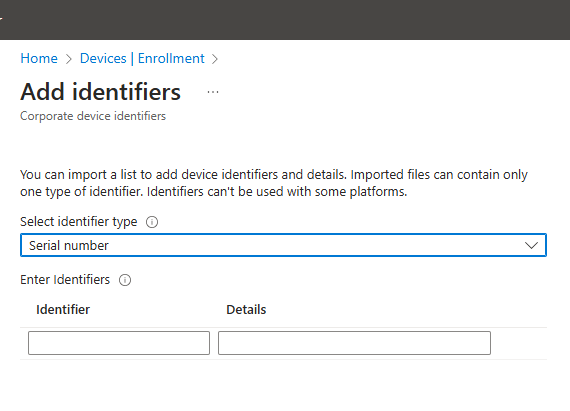
Key takeaway: It's better to add the serial number of the macOS device as a corporate identifier, so BYOD is still blocked. Using corporate device identifiers in Intune enables automatic enrollment, ensures only authorized company devices can register, and streamlines zero-touch deployment (e.g., Autopilot). Common identifiers include serial numbers, IMEI, and hardware hashes.
Step 2: Install the Company Portal App
The user downloads Microsoft Intune Company Portal via https://aka.ms/EnrollMyMac
Launch the Company Portal and sign in with their Entra ID credentials
Step 3: Install the MDM Profile
The user will be prompted to install the MDM profile
Open System Settings -> General -> Profiles, and approve the MDM profile
Once installed, the Mac will start receiving Intune policies
✅ Best for: Non-ABM corporate-owned devices or personal Macs
Method 3: User Enrollment (BYOD)
For employees using their personal Macs, User Enrollment provides a work-only profile with limited control.
Step 1: Enable User Enrollment in Intune
In Intune Admin Center, go to Devices > macOS > Enrollment > Device Platform Restrictions
Ensure that Personally owned devices is allowed or use the corporate identifiers.
Step 2: Install the Company Portal App
The user downloads Microsoft Intune Company Portal at https://aka.ms/EnrollMyMac
Signs in with their Entra ID credentials
The user will be prompted to install the MDM profile
Open System Settings -> General -> Profiles, and approve the MDM profile
Step 3: Manage Work Apps and Policies
Only work-related apps and policies will be managed
The user's personal data remains untouched
IT can enforce work-related security policies
✅ Best for: Employee-owned devices (BYOD)
Verifying and Managing Enrolled macOS Devices
Checking Enrollment Status in Intune
In Intune Admin Center, go to Devices > macOS
Click on the device name to check enrollment status
Ensure it shows Compliant / Enrolled
Applying Compliance and Configuration Policies
Go to Devices > macOS > Compliance policies
Create and assign policies for passwords, encryption, firewall, etc.
Deploy configuration profiles for Wi-Fi, VPN, certificates
Next Steps
Now that your macOS devices are enrolled in Intune, you can:
Configure security policies (FileVault, password enforcement)
Deploy applications (PKG, DMG, Mac App Store)
Monitor compliance and reporting
🚀 Up next: Managing macOS Security and Compliance in Intune
Want to Stay Updated?
🔹 Follow this blog for more Intune macOS management tips!
🔹 Leave a comment if you have any questions!
That is it for now. Until next time. 👋