Gettings started with Microsoft Teams Rooms (Part 3)
Welcome back for part 3 of this series on how to get started with Teams Rooms.
In part 1, we have configured the MTR-account in Office365, assigned a Meeting Room license, created a resource mailbox with some optional parameters for automatic reply and so on, enabled Skype for Business (as a room) and set the password no not expire.
In part 2, we have installed an MTR in Hyper-V and installed the MTR software on the device. We also configured the MTR with the account settings from part 1.
This series is divided in the following posts:
Part 1: Creating the Teams Room account and arrange the license
Part 2: Installing Microsoft Teams Room in Hyper-V
Part 3: Connect and manage it with Microsoft Endpoint Manager
Part 4: Customize the Microsoft Teams Room
Part 5: ?
You can find the files, scripts and other stuff that I have used in this series on my GitHub page at https://github.com/BurgerhoutJ/scripts/tree/main/microsoft-teams-rooms.
Part 3: Connect and manage it with Microsoft Endpoint Manager
In this part, I assume that you have followed part 1 and part 2, we have a working MTR available. You can check the compliance of the device with Microsoft Endpoint Manager by pushing a compliance policy. You can also push other configurations, but the MTR handles it’s own updates.
What do we need?
You must have the following:
- A working Microsoft Teams Room
- A Microsoft Endpoint Manager / Azure AD tenant
- Internet (of course)
- An Azure AD Device Group
- Compliance policy
Azure AD Device Group
First, we are going to create a device group in Azure AD to populate all the MTR’s into one group.
To do this, go to https://endpoint.microsoft.com and login and proceed with the following steps:
- Go to Groups
- Click on New group
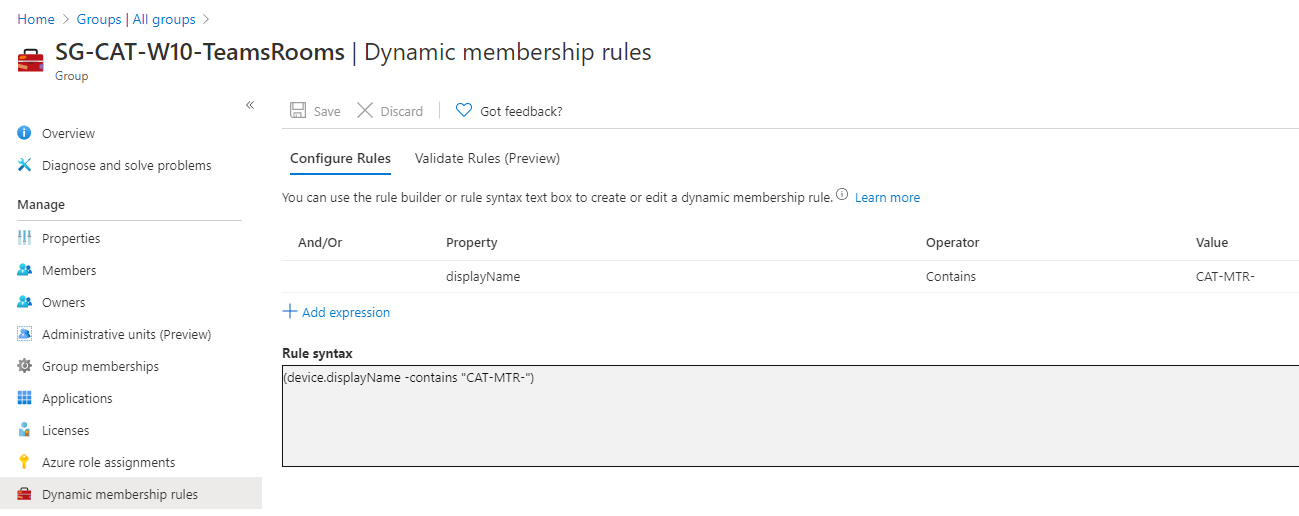
- Give the group a name, in my case the group is called ‘SG-CAT-W10-TeamsRooms’
- Set the Membership type to Dynamic Device
- Click on Add dynamic query
- And fill in the Rule syntax field the following syntax: (device.displayName -contains "CAT-MTR-"). Change the CAT-MTR to your device naming template.
- At the end, the group should like this:
That is, it for the Azure AD group. Next, we go to create a Compliance policy.
Compliance policy
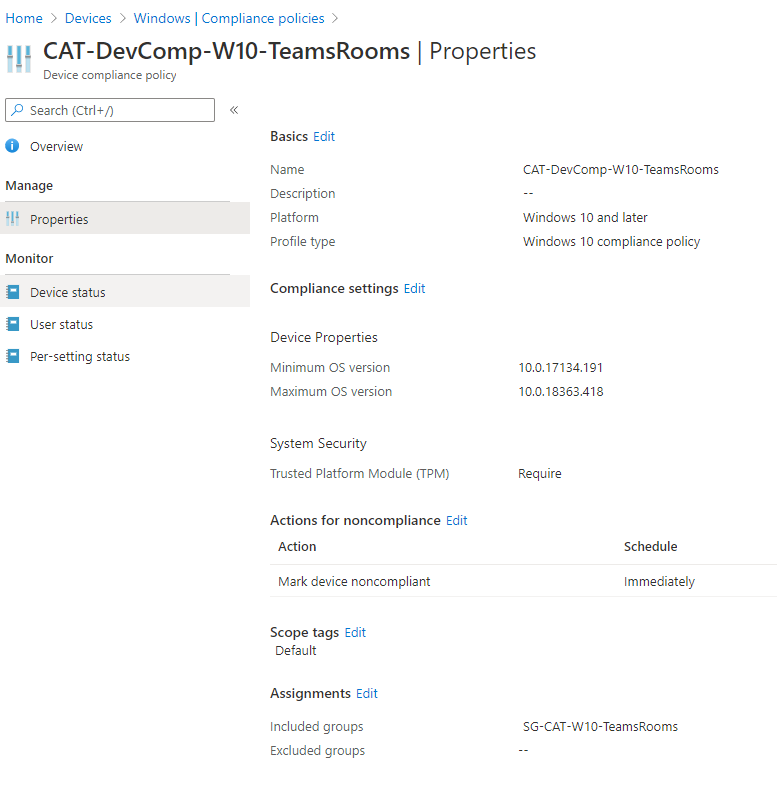
To get an insight if your active Microsoft Teams Rooms are still compliant, you can create a Compliance policy. With this Compliance policy, you can set for example, the minimum and the maximum OS version, if the MTR requires a TPM and so on.
To create a Compliance policy, go to Devices -> Windows -> Compliance policies.
- Click on Create Policy
- Select Windows 10 and later as Platform and click on Create
- Give the policy a name and click on Next
- Under the Device Properties node, type 10.0.17134.191 as minimum OS and 10.0.18363.418 as maximum OS.
- Under System Security, require a Trusted Platform Module (TPM)
- For now, click Next
- Click Next again
- Assign this policy to the Azure AD group, which you created earlier, and click Next
- And at the Review + create tab, review everything and click on Create.
Now we have created a Compliance policy and assigned it to the earlier created Azure AD group. Next up, the Device Enrollment Manager.
We are switching to the MTR and we are going to connect the MTR to your AzureAD tenant, and we can manage this through the Endpoint Manager portal.
On your Microsoft Teams Room, exit the Microsoft Teams Room environment and login with the local Administrator account.
- Open Settings
- Click on Accounts
- Click on Enroll only in device management
- Type the email address of your resource account (MTR account)
- Provide the necessary password
- Click on Got it
TIP: Check after a while if the folder C:\Program Files (x86)\Microsoft Intune Management Extension. If it is not there (yet), you can manually install the Intune Agent by downloading it from https://burgerhou.tj/IntuneWindowsAgent.
The MTR is now connected with your Microsoft Endpoint Manager / Azure AD tenant.
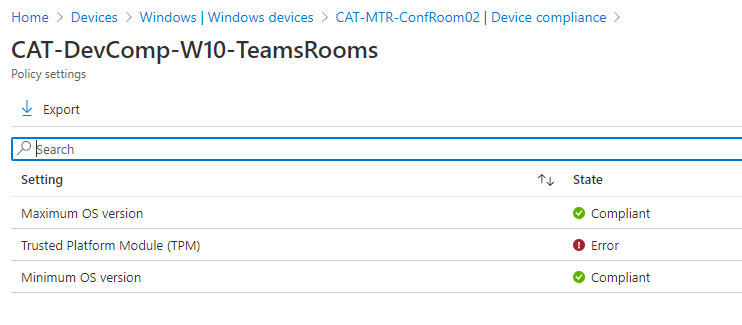
After a few minutes, you will see in the MEM portal, that your device is compliant or not. In my case not, I see, because I forgot to enable TPM on the VM.
And with this, we are at the end of this part. In the next part, we will look on how we can customize the MTR for example a custom theme, so see you next time!
Resources